
Share this post
If your once-green leaves have turned bronze and brittle, without a sign of what could’ve caused it, your problem could be the russet mite. These pests are small but capable of doing damage to many plants in a matter of days.
Left untreated, the russet mites can diminish your yields, but trying to get rid of them with harsh chemicals can do just as much damage. In this guide, you’ll learn:
- How to spot the signs of an infestation
- How to get rid of russet mites in an eco-friendly way
- The best practices to prevent them from coming back
Early warning signs usually appear in the lower canopy. Leaves fade from healthy green to dull yellow, before becoming the rusty-brown color that gives russet mites their name. As feeding continues, the edges curl upward, turn brittle, and stems develop a subtle bronze sheen. Untreated, the damage creeps higher: leaves droop, flowers wither, and overall health fades.
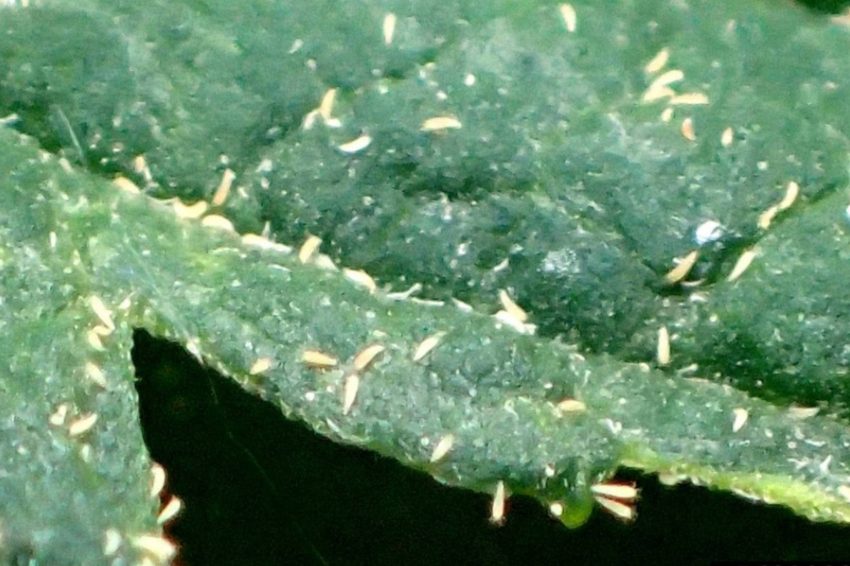
Because each mite is only about 0.2 mm (far smaller than a grain of sand), you’ll need a 40–60× loupe to confirm their presence. Focus on the undersides of leaves, new shoots, and leaf axils where mites congregate first. Catching even a handful early can save an entire crop, so make magnified weekly check-ups part of your IPM routine.
This guide explains how to identify russet mite damage and eliminate these pests using plant-safe methods.
Identify & Eliminate Russet Mite Hotspots
Russet mites are eriophyid mites, which means they have only two pairs of legs and a cigar-shaped body. You usually won’t see the mites until populations explode, but the damage they cause is distinctive.
Infested leaves often develop a fine bronzed or rust-colored tint, hence the name “russet” mite. Severely damaged lower leaves can become brittle and break off.
Large colonies can manifest as a light ‘dust’ or speckling on the leaf surface. The mites are translucent, so you might only catch glimpses of them moving across leaves or stems under strong magnification. Carefully inspect hidden areas like growing tips, bud sites, and the undersides of leaves.
The Russet Mite Life Cycle
As a grower, you should be aware of the life span of russet mites since they are rapid reproducers. In warm, humid conditions, their entire cycle (egg through adult) can be completed in as little as 7-14 days. Females can lay a dozen or more eggs, with multiple overlapping generations per season. Adult russet mites usually live a few weeks, roughly 2-3 weeks on average.
The life cycle can vary between species of russet mite. The hemp russet mite, for example, has an average cycle of closer to three weeks. With perfect warmth and humidity, a single mite can survive for up to 30 days.
While russet mites don’t have a true dormant, or overwintering, stage, they can still persist through colder seasons by surviving on other living tissue. This includes alternate host plants such as nightshade and bindweed, which remain viable during mild winters.
With a generation time of between 7 and 14 days, any mites that make it through the off-season can multiply rapidly once temperatures rise. To prevent this, you have to adopt a zero-tolerance weed-control and crop-removal plan.
What Attracts Russet Mites?
Russet mites thrive in warm, dry environments. This means that infestations are often worse during the summer. They are especially drawn to tender new growth. Nitrogen-rich foliage and buds in flower make ideal feeding sites. Over-fertilizing (excessive nitrogen) can stimulate fast growth that encourages mite outbreaks.
Mites are known to hitchhike in potting mix or on plant material. Because of this, the first signs of infestation often appear on outdoor plants, container-grown crops, or greenhouse benches. Other factors that introduce mites include:
- Infested cuttings
- Transplants
- Second-hand tools and clothing
This is why anyone working between the grow areas should clean their equipment and thoroughly wash their hands.
In summary, anything that creates dense, protected foliage or provides infected material will attract russet mites.
Eliminate Russet Mites Without Ruining Buds & Flowers
Once you’ve confirmed russet mites are present, work through the steps below in order.
- Prune and remove. Immediately cut off and destroy any visibly infested foliage. Place the removed material in plastic bags and dispose of it far from your grow area. Severely affected parts of the plant, or whole affected plants, may need to be uprooted altogether to stop mite migration. Remove any debris to cut down the population and help treatments reach hidden mites.
- Wait one hour before applying any treatments. This gives the plant time to recover from pruning stress and helps avoid further shock when you spray.
- Apply Protection Plus™. Make sure to thoroughly coat the undersides of leaves and stems. Since Protection Plus™ needs to make contact with the pest in order to eliminate, a fine mist coating over the entire plant is the most effective method of application. Spray the soil surface as well to target mites that may be crawling near the base.
- Inspect plants again after 1-3 days. Protection Plus™ can take up to 24 hours to eliminate pests, depending on application coverage and insect skin thickness.
- . If mite activity is still present, reapply. Continue treatment until new growth appears healthy and no further damage is visible. Discard any plants that don’t recover, and clean the surrounding area well.
- Weekly monitoring. Since Protection Plus™ is a contact killer and russet mites are so small, they can be easy to miss. Maintain control with weekly monitoring and follow-up treatments as needed. Clean tools, gloves, and equipment after each use. Avoid bringing in untreated cuttings or transplants, and remove weeds or plant debris that could host mites.
Why Protection Plus™?

Our product uses food-grade, citric acid-based ingredients to dissolve mite exoskeletons. This not only eradicates adult mites, but also their eggs and larvae. Independent tests showed 98% russet mite mortality on first application. Protection Plus™ is a water-based pesticide for russet mites and many other pests. Since it contains no oils, you won’t deal with the common problems growers face when using oil-based products like neem or mineral oil, such as residue or clogged stomata.
How Do You Prevent Future Infestations & Russet Mites Damage?
The best defense against russet mites is prevention. Follow these steps to keep russet mites away from your crops:
- Use clean plant material. Start with certified mite-free seeds and cuttings. Quarantine any new plants or clones before adding them to your grow area. Inspect new transplants carefully, especially leaf undersides.
- Remove alternate hosts and debris. Regularly pull weeds and dispose of volunteer plants, which can shelter mites. After a crop, remove and destroy old plant debris (compost infested plant parts away from your garden). This removes places where mites could overwinter.
- Maintain strong sanitation. Disinfect tools, pots, and trays between uses. Change work clothes or wash hands when moving between growing areas to avoid carrying mites on fabric.
- Monitor regularly. If you’re recovering from a recent russet mite infestation, we’d recommend weekly plant checks with a hand lens where you focus more on new shoots and lower leaves. Identifying infestations early significantly reduces the potential for widespread crop damage.
Maintain these practices year-round to reduce the chance of a large population of russet mites establishing themselves in your crops.
Featured image credit: https://agsci.colostate.edu/agbio/ipm-pests/29895-2/